Tech Stack
For this sample project, our primary language is JavaScript.
On the backend, we'll be using Node.js with Express framework and the oracledb module.
On the frontend, we'll keep things simple with a static webpage comprised of an HTML file and a JavaScript file (We also provide an optional CSS file, you can choose to use it or craft your own if you want to style your webpage further!). This approach ensures we don't delve deep into complex software or web application development, as our focus is on the database aspect.
We hope this sample project, might serve as a skeleton, will help reduce your coding workload and allow you to concentrate more on designing a robust DB schema and crafting intricate queries!
Next Steps
In the following sections, we'll guide you through setting up the sample project, deploying it on our remote server or your local computer, and understanding the code logic for one of the functionalities from end-to-end. We'll also provide you with some ideas on choosing an IDE and debugging your project. Let's get started!
Choice of IDE
You're free to use ANY IDE of your choice. If you are using VS Code from the undergraduate servers, note that VS Code will produce a lot of artifacts that eventually eat up all of your storage space so be sure to delete the artifacts directory every so often.
Set up Sample Project
For Windows users
Before moving forward with the next steps, ensure that you have the required SSH client installed on your computer. This is crucial for our helper scripts to run seamlessly. More details-
For Windows 10/11:
Windows 10 has included OpenSSH since the October 2018 Update. However, it may not be installed by default across specific versions and builds.
To verify it has already been installed on your system, typesshin a command prompt (cmd). If the command shows usage instructions for ssh, you already have the SSH client installed and can proceed to the next part!If not, follow these steps to install the OpenSSH components:
- Open Settings, select Apps, then select Optional Features.
- Scan the list to see if the OpenSSH is already installed. If not, at the top of the page, select Add a feature, then:
- Find OpenSSH Client, then select Install
- Once setup completes, return to Apps and Optional Features and confirm OpenSSH is listed.
These YouTube videos might help you further: for Windows 10 and for Windows 11.
-
For Windows 7/8 and Windows 10 (pre-April 2018 Update):
Install PuTTY using its default path. Download the Installer (
.msi) to install and DO NOT directly download the standalone executables (.exe).This YouTube tutorial will guide you through the installation process:
Clone the project by downloading the zip file here.
CAUTION!
Exercise caution when renaming files in this project. Only make changes if you're certain about all explicit and implicit dependencies linked to them.
Specifically, avoid renaming the following files:
server.js.env
If you don't see .env and .gitignore in your unzipped project...
While by default, standard graphical directory views (like Finder in macOS or 'My Computer' in Windows) don't display files that start with a '.', such as our .env and .gitignore file, you can easily see and access these files when you open the project with IDEs like IntelliJ.
If you just cloned the project, you may notice that there is no .env file in the project directory. This is intentional, because it is a bad practice to include a .env file in a GitHub repository (Why? check out this comic generated by Nano Banana Pro).
Follow the instructions to create a .env file in the root directory of the project. Note that there is an entry for .env inside .gitignore, so it will remain untracked.
We've set up a Node.js environment for you on our remote ugrad server. Essential packages, such as express and oracledb, are pre-installed. We've also configured the references to these packages in the startup script for your runtime.
If you prefer, you can set up an environment on your local machine, especially if you wish to use additional packages. We cannot guarantee assistance with issues related to individual local for local setups, as there are countless variations. However, we have provided detailed instructions to help here.
Deployment Options:
Follow the underlined steps every time you start the application. The steps without underlining only need to be done once, given that you don't make any changes to the correlated areas later.
Change database credential:
Open the .env file, adjust the database username and password based on the placeholder to configure the sample project to your own Oracle database.If you are unable to see the.envfile in VS Code, you will need to update your VS Code settings. PressCtrl/Cmd + ,to go to the settings and search for theFiles: Excludesetting. Remove the**/.*option (or something similar) from the exclude list. The.envfile should now be visible in VS Code.Deploy the sample project:
- Transfer the unzipped folder to the remote server using the command below. Ensure you're in a parent directory of the unzipped folder.
You can also use other file transfer tools like Cyberduck.- For Windows users, if the command doesn’t work or if you prefer using another method, you may find the instructions for using Xftp to be helpful, though you will need to access the undergrad servers listed
here
-
Mac users can just do the following command:
scp -r <location of the project folder> YOUR-CWL-ID@remote.students.cs.ubc.ca:<destination on the server>
- For Windows users, if the command doesn’t work or if you prefer using another method, you may find the instructions for using Xftp to be helpful, though you will need to access the undergrad servers listed
here
- Transfer the unzipped folder to the remote server using the command below. Ensure you're in a parent directory of the unzipped folder.
-
Starting the Sample Project:
-
SSH into the remote server:
Additional instructions can be found at here. Please make sure to follow the "undergrad instructions" about halfway down the page.
ssh YOUR-CWL-ID@remote.students.cs.ubc.ca
- Navigate to the remote directory of the sample project.
-
Run the project's start script:
This script is essential for starting the project on the remote server, as it includes important configurations for the node runtime environment.
sh ./remote-start.sh
After running the script, you should see a message in the terminal similar to:
Server running at http://localhost:<node starting port number>/. Note down the<node starting port number>. - If you see a
Permission deniederror after running the shell script, you can fix this by runningchmod +x remote-start.sh. This grants execute permission for the file. - If you see an error like
Syntax error: "elif" unexpected (expecting "then")and you are on a Windows machine, it may be the case that the line endings are causing an issue. Runsed -i 's/\r$//' remote-start.shandsed -i 's/\r$//' .envto fix the issue.
-
SSH into the remote server:
-
Building an SSH Tunnel to the Remote Node Application:
Sometimes, IDEs like Visual Studio Code can automatically handle port forwarding for you when you start the application remotely within their built-in SSH connection session. In such cases, you don't need to perform this step manually and you can directly access your application on that port

We've provided a script to facilitate the SSH tunnel creation to the remote node application:
- Open a new terminal in your local project folder on your local machine, not the server.
-
Depending on your operating system:
- Mac users:
sh ./scripts/mac/server-tunnel.sh
- Windows users:
.\scripts\win\server-tunnel.cmd
- Mac users:
- Follow the instructions in the terminal. You'll need to enter the
node starting port numberyou noted earlier. The subsequent steps resemble the process of starting an SSH connection to the ugrad server.
-
Accessing the Sample Project:
After you've input your node's starting port number in the previous step, you should see a message similar to:
--------------------------------------------------------------------------
At this point, you can access the sample project via the provided URL.
You will be able to access your application at:
http://localhost:<Local Accessing Port Number>
after completing the steps below...
--------------------------------------------------------------------------
❗ Warning: When you launch the project for the very first time, you will see:
[Error: ORA-00942: table or view does not exist] {
    errorNum: 942,
    offset: 14
}
This is normal and is due to the fact that we have not yet created the table the sample project depends on. Click on the "reset" button and then you can continue to explore the project.
-
If you prefer running your code locally, follow the below steps:
Install Node.js:
refer to its official website for more detailsChange database credential:
Open the .env file, adjust the database username and password based on the placeholder to configure the sample project to your own Oracle database.-
Set up SSH tunneling to connect to your Oracle database:
We have provided a script to automate the process of setting up the tunnel. Please follow these steps:
- Open a new terminal or command prompt window and navigate to the project's folder.
-
Depending on your operating system, run the appropriate command:
- Mac users:
sh ./scripts/mac/db-tunnel.sh
- Windows users:
.\scripts\win\db-tunnel.cmd
- Mac users:
-
After running the command, enter your CWL password when prompted. The subsequent steps will resemble the process of starting an SSH connection to the ugrad server. This also opens a command line on the remote server and has a timeout similar to an SSH connection. Keep this Terminal window open -- your computer needs to be tunneled into the CS department servers in order for your application to reach the database.
Install the required packages: (Repeat this step if you/your teammates add more packages to the project through implementation)
After installing Node.js, verify its installation by running:
node --version
Navigate your terminal to the project folder and run:
npm install
This installs the required packages for the project. If you add new packages during development, run this command again to ensure those modules are added to your runtime library before starting the application.
Oracle Instant Client Installation and Configuration:
To connect to the Oracle database using the oracleDB module, we need to install the Oracle Instant Client and set its path as an environment variable, which our application can reference during runtime.- Download the Oracle Instant Client:
Click the provided link to directly download the basic light version zip files. Alternatively, if you're using a different machine or prefer the basic version, visit Oracle Instant Client Downloads page.- For Mac (Intel x86) users: Basic Light Package (ZIP)
- For Windows (x64) users: Basic Light Package (ZIP)
- Install Oracle Instant Client:
Unzip the downloaded file to a directory of your choice. - Get the absolute path:
- Open a Terminal or Command Prompt and navigate into the unzipped folder of the Oracle Instant Client.
- Mac users: Type
pwdand press Enter to get the absolute path. - Windows users: Type
cdand press Enter to get the absolute path.
- Set the environment variable for your startup process:
We've created scripts to help streamline the environment variable setup and application startup process.- Mac users: Run
sh ./scripts/mac/instantclient-setup.sh
in the Command Prompt in your project folder. - Windows users: Run
.\scripts\win\instantclient-setup.cmd
in the Terminal in your project folder.
You will need to copy the absolute path of the Oracle Instant Client, which you obtained in the previous step, into the command line. This will help generate a script named
local-start.shfor Mac users andlocal-start.cmdfor Windows users. These scripts include setting up the Oracle environment variables before actually starting the Node application. - Mac users: Run
- Download the Oracle Instant Client:
- Start the sample project locally:
If you successfully ran the command in the previous step, you should see a message in the terminal similar to:
--------------------------------------------------------------------------
You can run the corresponding script to start the sample project.
Setup complete. Run 'sh local-start.sh'/'local-start.cmd' in your project folder to start your Node.js application.
--------------------------------------------------------------------------- Mac users:
sh local-start.sh
- Windows users:
local-start.cmd
- Mac users:
- Access the Sample Project:
If you successfully started the application in the previous step, you should see a message in the terminal similar to:
Server running at http://localhost:<node starting port number>/. You can access the sample project by entering this URL into your browser.
❗ Warning: When you launch the project for the very first time, you will see:
[Error: ORA-00942: table or view does not exist] {
    errorNum: 942,
    offset: 14
}
This is normal and is due to the fact that we have not yet created the table the sample project depends on. Click on the "reset" button and then you can continue to explore the project.
❗ If you encounter an error message like
Error: listen EADDRINUSE: address already in use :::<some port number>, it means the port number specified in the .env file is already in use. In this case, simply change the value in thePORTfield in the .env file to a different port number.


Explanation of the Code Logic for a Functionality, End-to-End
In our sample project, when you aim to build or adjust a functionality, there are typically four key areas where modifications are necessary:
Front-end:
index.html: This determines the appearance and information tagging on the web page.scripts.js: This handles frontend data parsing and rendering logic.
Back-end:
appController.js: This layer specifies the routes (URLs) to which our backend can respond. Depending on the frontend interaction, different routes will invoke different functions.appService.js: This is where the logic for each functionality resides. It's also the layer where we access the database.

Insert Function Example:
Let's take a closer look at the structural logic of our insert function as an example.
In our index.html file, the following code snippet represents the frontend section for this functionality. We have two input boxes: a number input with the identifier 'insertId' and a text input with the identifier 'insertName'. Additionally, there's a submit button and a placeholder to display messages.

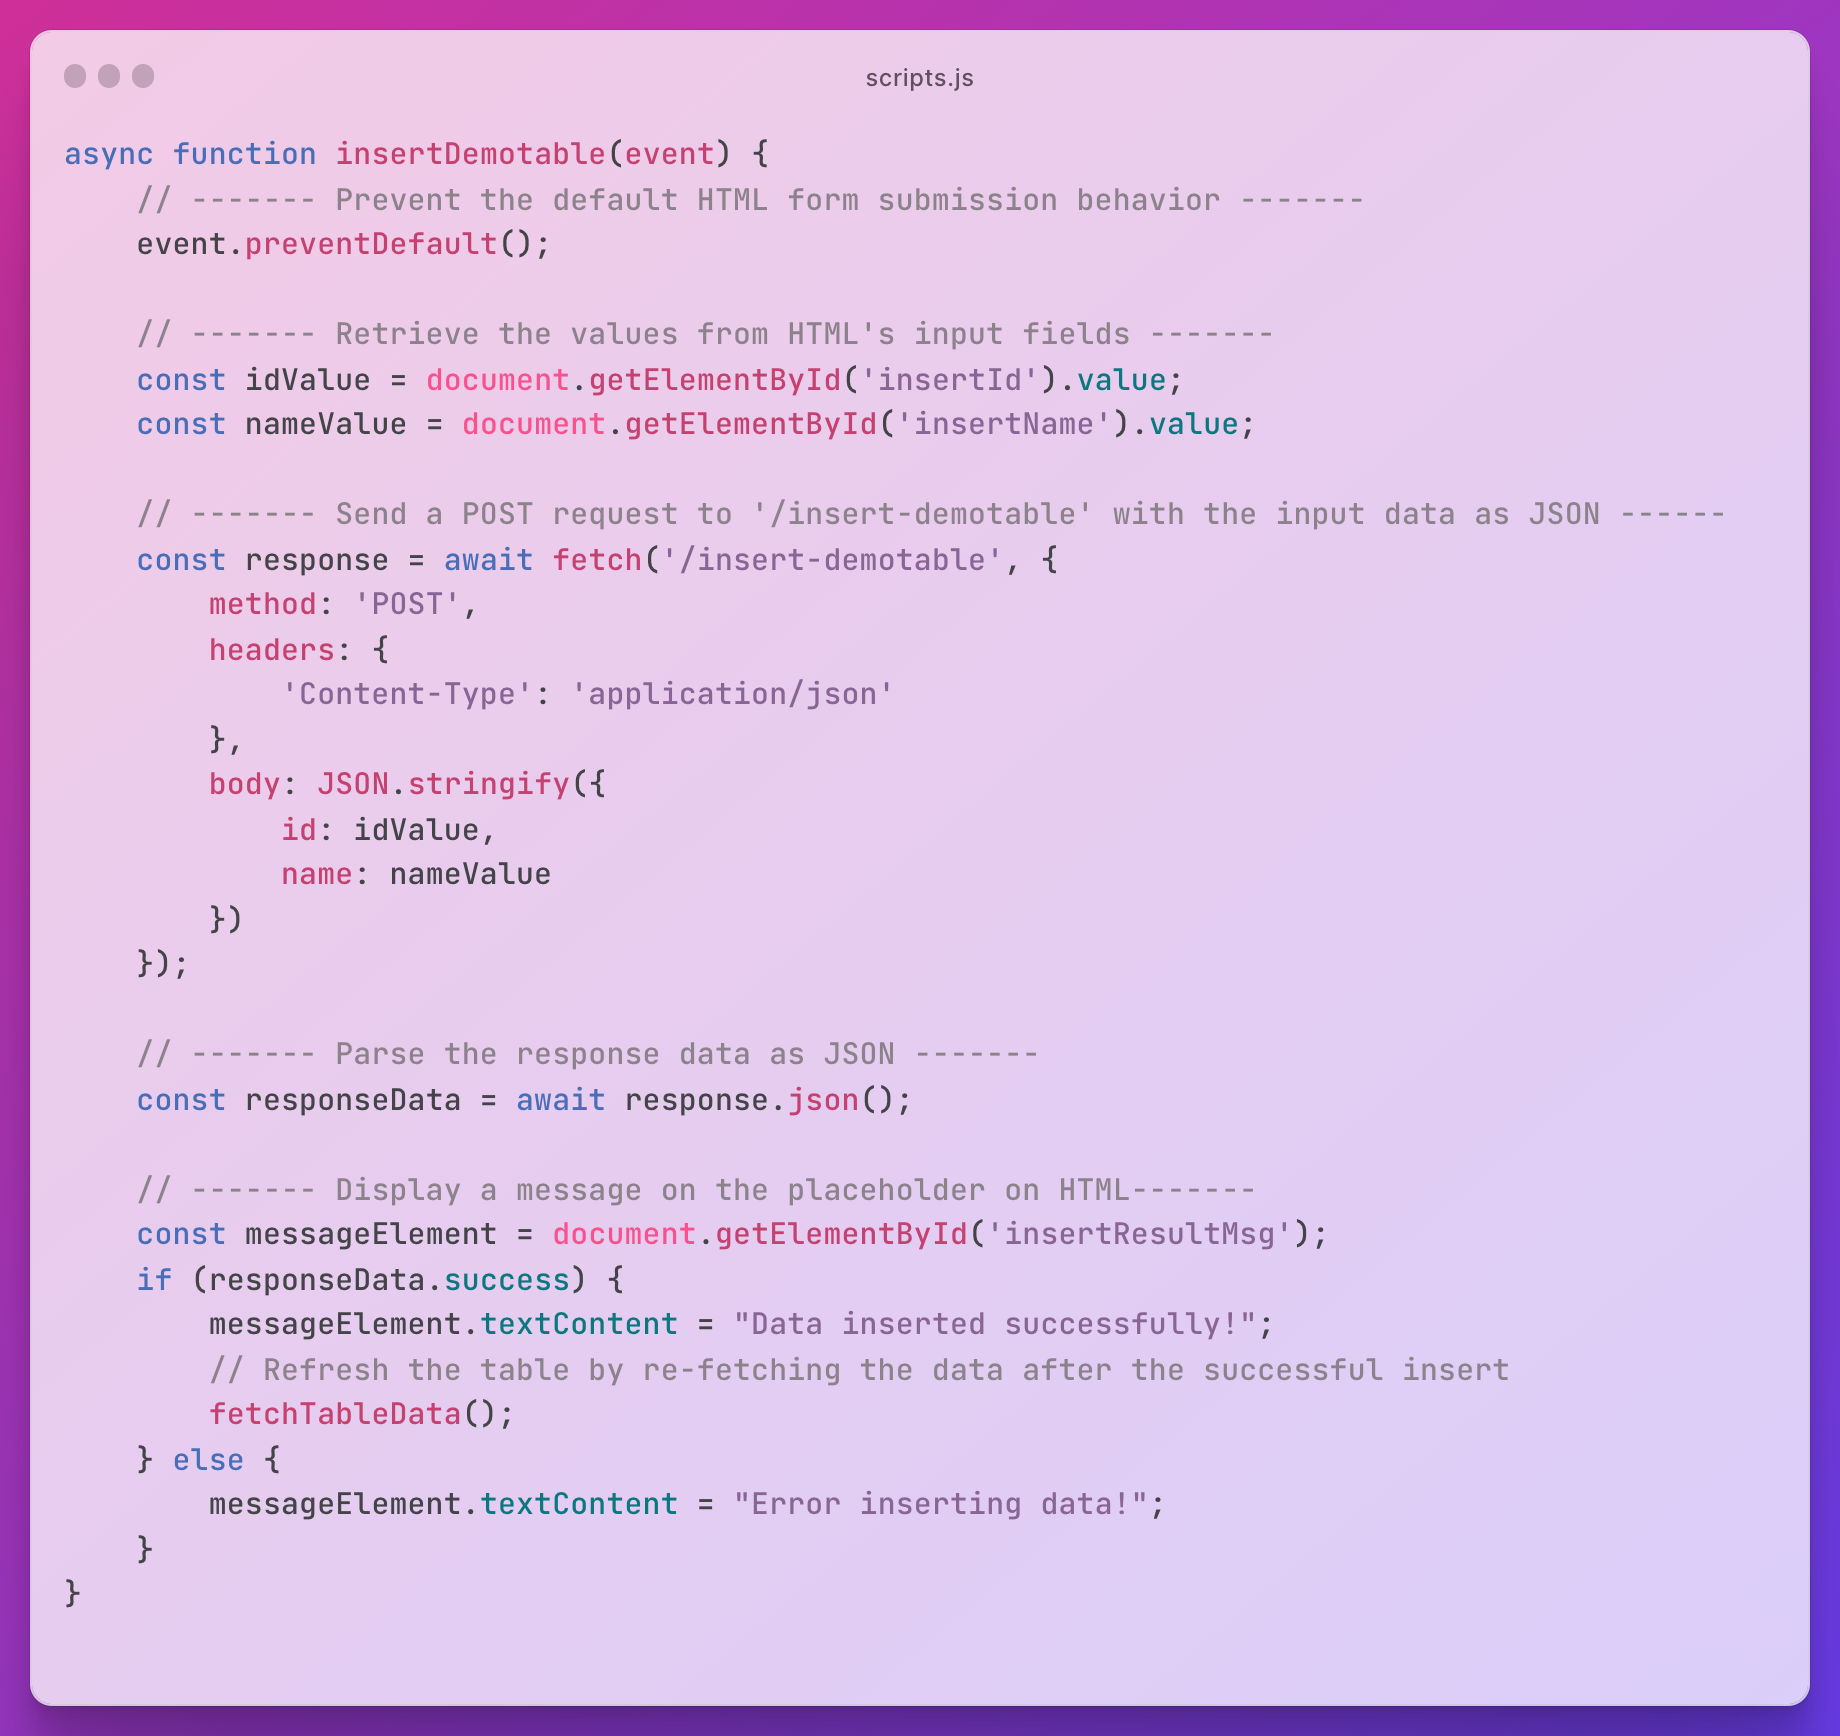
In the scripts.js file, at the very bottom, we configure the logic associated with each user interaction on our webpage. When crafting your own application, ensure you adjust this configuration accordingly.

The main function for insertion first fetches the user's input data using their respective identifiers, then sends a request to our server with this data. Upon receiving a response, it displays the result message in the index.html file (our GUI).
Note that this function also invokes a table rendering function, ensuring our displayed table remains synchronized with our database. While not mandatory in your implementation, maintaining this synchronization is a good practice.
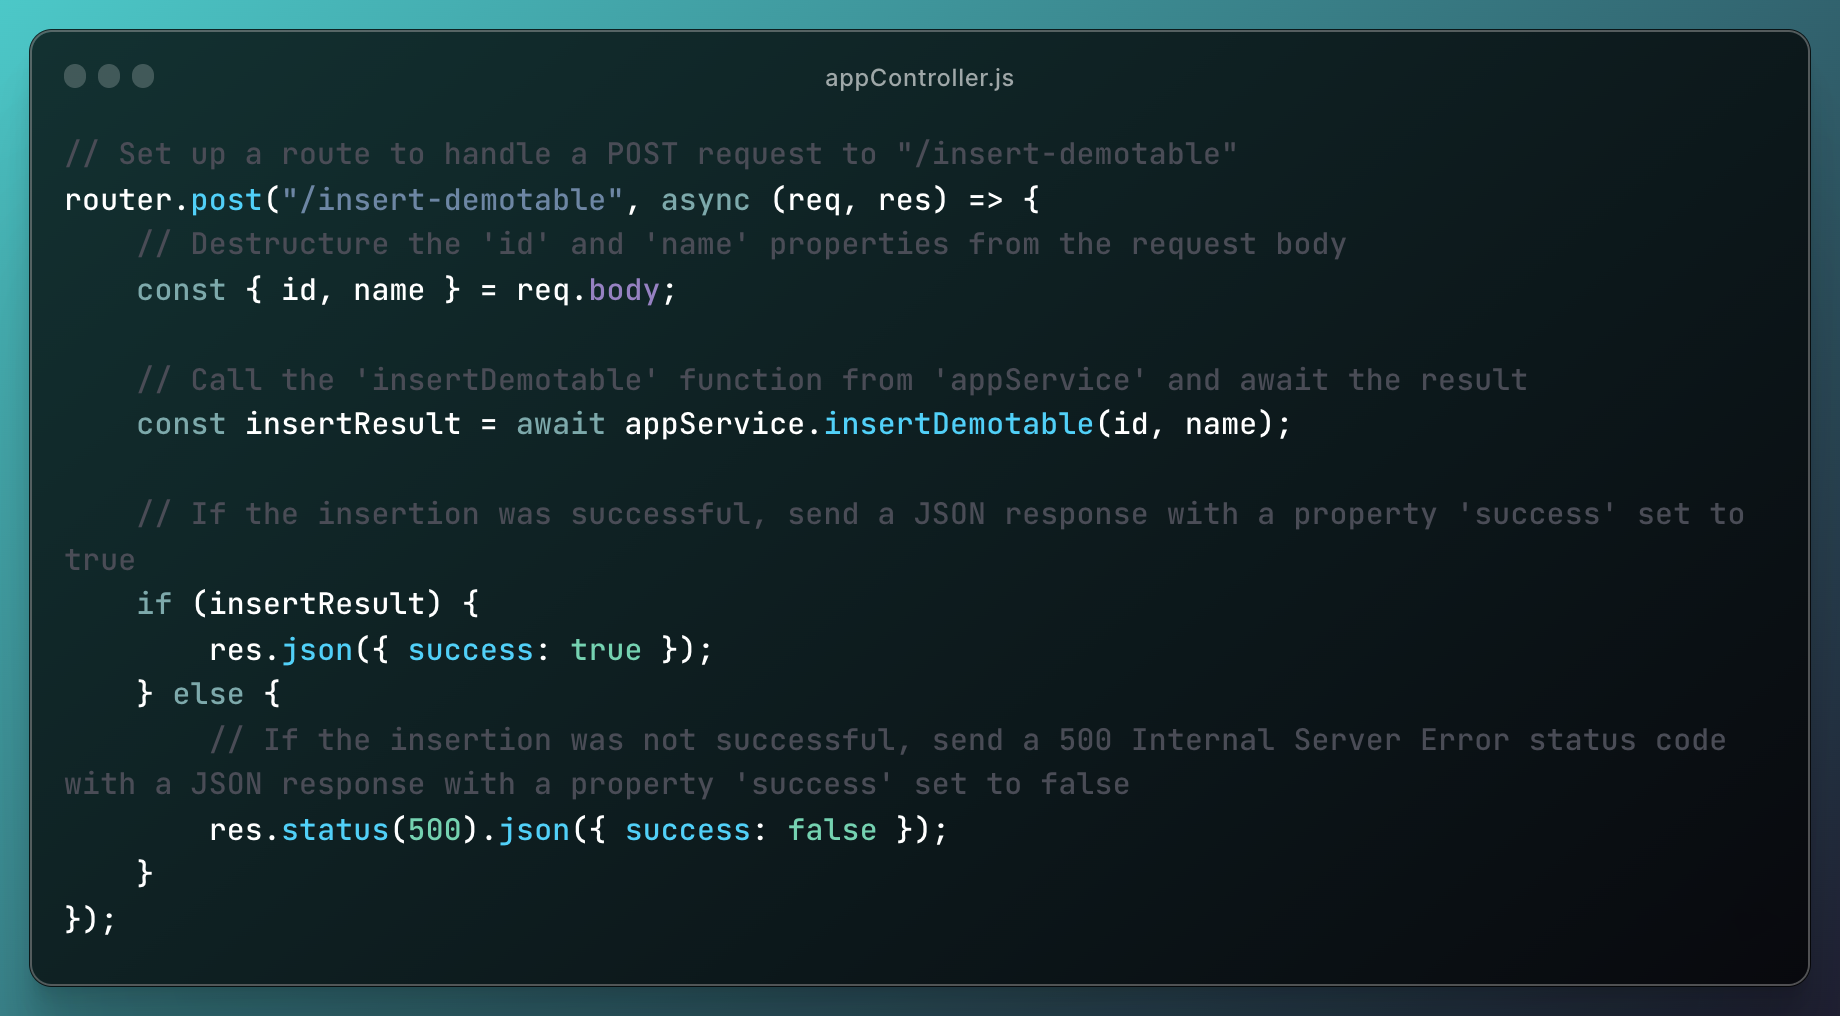
Transitioning to the backend, the server.js file serves as the starting point of our backend logic. In this file, we simply route all incoming requests to be handled by the controller, appController.js.

Transitioning to the backend, in the appController.js file, we first extract the values from the request received from the frontend. Next, these values are passed to the service layer for processing. If the operation is successful, a 'true' message is sent back to the frontend; otherwise, a 'false' message is sent.
(Sidenote: The format used in our request and response to capture data is called JSON, which stands for 'JavaScript Object Notation'. It's essentially an object notation, allowing you to access values using declared variable names. JSON can be multi-layered, so exercise caution when working with it to avoid potential issues.)
Finally, we delve into our service layer, appService.js. This section is paramount, especially since we're in a DATABASE COURSE. Here, we communicate directly with our database (in this example, the Oracle database). We utilize a "withOracleDB" helper function to establish and close the database connection. Through a lambda function, we obtain a database connection object, which is then used to execute our query.
Note: When making changes to table data (e.g., insert, update, delete), consider including the {autoCommit: true} option to ensure changes are committed to the database.
If any errors arise, we simply return 'false' to the controller, indicating an insertion error.

Lastly, don't forget to export the function in the appService.js that you want to use in the appController.js.

Debugging
A typical debugging process can be broken down into four steps:
- Locate the Problem
- Understand the Error
- Attempt to Resolve the Problem
- Test the Solution
1. Locate the Problem
1.1 Broadly Identify the Area
First, determine which part of your application is causing the issue. Is it in the front-end, back-end, or the database?
A valuable tool for web project debugging is the browser's developer tools. In Google Chrome, you can access it by pressing F12 or by right-clicking on a webpage and selecting 'Inspect' (more information here). The place where you right click matters: if you right click on a specific element of your page, Chrome will show you the html code corresponding to that element.If you're using a different browser, you might need to look up how to access its developer tool.

Using this tool, you can determine if the issue lies in the front-end or back-end logic. Examine the data received from requests. If the data is correct but rendered incorrectly on the webpage, the issue likely lies in the front-end. If the returned data itself is unexpected, the back-end logic might be at fault.

Backend errors will typically display messages in the console where your application started. This includes errors like Syntax, Run-Time, and Semantic Errors. However, logical errors won't produce such messages, so they can be trickier to spot and might require a thorough review of your code logic. To see error messages in the console, it's essential that errors are correctly caught and logged. Just as in Java and C++, severe errors might terminate the application.
In our sample application, Oracle error messages will also appear in the console, based on our connection helper function's logging logic. While errors during querying generally don't terminate the entire database, you should still exercise caution when performing actions that modify database data.
1.2 Pinpoint the Error to a Specific Line
For JavaScript debugging (both front-end and back-end), you can use the standard JavaScript logging function, console.log(). Logs will display in the browser's web console for front-end issues and in the terminal or command prompt for back-end issues. More about console.log().
If you prefer stepping through code and pausing at specific lines:
- For the front-end, use the developer tools in your browser. More on this here.
- For back-end debugging, you'll need Node.js installed on your computer to run the application locally. Some IDEs, such as IntelliJ Ultimate and Visual Studio Code, offer line-by-line debugging capabilities. Using these IDEs after proper configuration, you can select the 'Run -> Debug' option when your entry point file (e.g., server.js) is open.
2. Understand the Error Message
This step can present a myriad of messages! If unsure, consider searching online or on Piazza to see if others have encountered similar issues. Logical errors won't produce explicit error messages, so understanding them often requires a thorough code review and examining your logs. You may find that StackOverFlow will be helpful in finding others who have had similar errors.
3. Attempt to Resolve the Problem
For this step, you'll rely on your understanding and problem-solving skills. By this point, you should have a clearer idea of how to address the issues.
4. Test the Solution
After making your adjustments, ensure you test the solution to verify that the issue has been resolved.